

Note: This post contains affiliate links. I receive commissions for purchases made through links in this post.
👉 Free Tutorial: DIY Scrappy Fabric Mod Podge Ornaments - Downloadable PDF
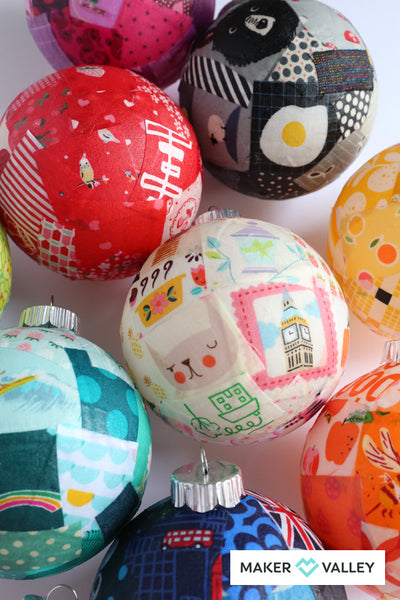
Let me show you how I made these fun, easy, scrappy fabric ornaments...

But first, I have to say that the inspiration for these came from these ornaments from my childhood. My Mom made these ornaments at least forty years ago for our family Christmas tree. Since both my parents passed away, my siblings and I each inherited a few of them, and they have become prized possessions.

This year, I was examining them—trying to figure out how she made them—when I remembered seeing a different kind of fabric ornament in years past. So, I decided to make my own. Here's how I did it:

First, I pulled a bunch of fabric scraps from my scrap bins (I got my storage bins at Target, but Amazon has a similar option) and cut them into about (30) 1½ inch squares for each ornament.

👉 Free Tutorial: DIY Scrappy Fabric Mod Podge Ornaments - Downloadable PDF
Then, using 100mm (about 4 inches) clear plastic ornaments (I got mine on clearance from Michael's, but Amazon sells them too), I took one, removed the top, and began applying the fabric squares using Mod Podge gloss. Note: they sell glass ornaments as well, but I went with plastic because I didn’t want to risk accidentally breaking them.

I painted a little of the gloss onto the ornament, added a square, and painted it down...

...then repeated the process with one square after another until I had covered the entire ornament. I also used tweezers—removing loose treads as I went.


Once the ornament was mostly covered, I cut a few of the squares into smaller pieces to fit Into the remaining little gaps between the pieces.


Then, I stood the ornament upside down and let the Mod Podge dry.

Once it’s dry, put the top back on and enjoy!


Leave a comment
This site is protected by hCaptcha and the hCaptcha Privacy Policy and Terms of Service apply.